Preparing Your Own Asset#
This guide demonstrates how to create custom garment assets from scratch and integrate them into the simulation pipeline. We use the SMPL pipeline as an example throughout this tutorial.
Overview#
Creating a custom garment asset involves several key steps:
Setting up the required software tools
Generating the garment mesh
Adjusting UV layout for proper texturing behavior
Setting up annotations for simulation constraints
Testing the asset in the simulation pipeline
Software Requirements#
The following software tools are required for the garment asset creation workflow:
| Software | Purpose | Version |
|---|---|---|
| Marvelous Designer | Sewing pattern design and draping | 10 |
| Unfold3D/RizomUV | UV layout manipulation to prevent texture stretching or overlapping | 9.0.2 |
| MeshLab | Post-processing, required for annotating constraint marker points and ensuring proper geometry info | 2022.02 |
Garment Generation#
This section covers the process of creating a garment mesh from scratch using Marvelous Designer.
Setup Mannequin#
In XRTailor, all clothing deformations under different body shapes and poses are synthesized based on a shared garment template. The space where this template resides is called the canonical space. Since SMPL’s human pose in the canonical space appears in T-pose form (θ=0, β=0), we define the garment under this state as the template.
To generate a garment template, a mannequin should be imported into Marvelous Designer first. The required mannequin can be found in the XRTailor Assets under Assets/Body/Template.
Import Settings#
Once your mannequin is ready, import it into Marvelous Designer with the following settings:
Scale:
m(meters)Axis Conversion:
(X, Y(Up), Z)
The import dialog should look like:
Avatar import settings
The imported mannequin should appear as shown below:
Imported mannequin
Disable Ground Collision#
Notice that there exists penetration between the avatar and the ground plane. To prevent simulation issues, disable ground collision by navigating to:
Preferences → Simulation Properties → Ground → Collision

Ground collision settings
Body Model Considerations#
Since body meshes vary across genders and body models, garment templates must be created separately for each body model and gender combination:
SMPL and SMPL-H: These bodies can be perfectly aligned in T-pose, eliminating the need for duplicate construction
SMPL-X: Exhibits differences in T-pose (including mesh topology and global translation) compared to SMPL and SMPL-H, requiring separate templates
Sewing Pattern Design & Draping#
This section covers creating garment patterns and simulating cloth draping on the mannequin.
Create Sewing Patterns#
Design garment sewing patterns that are suitable for the target body. Use Marvelous Designer’s pattern tools to create pieces that will form your garment:
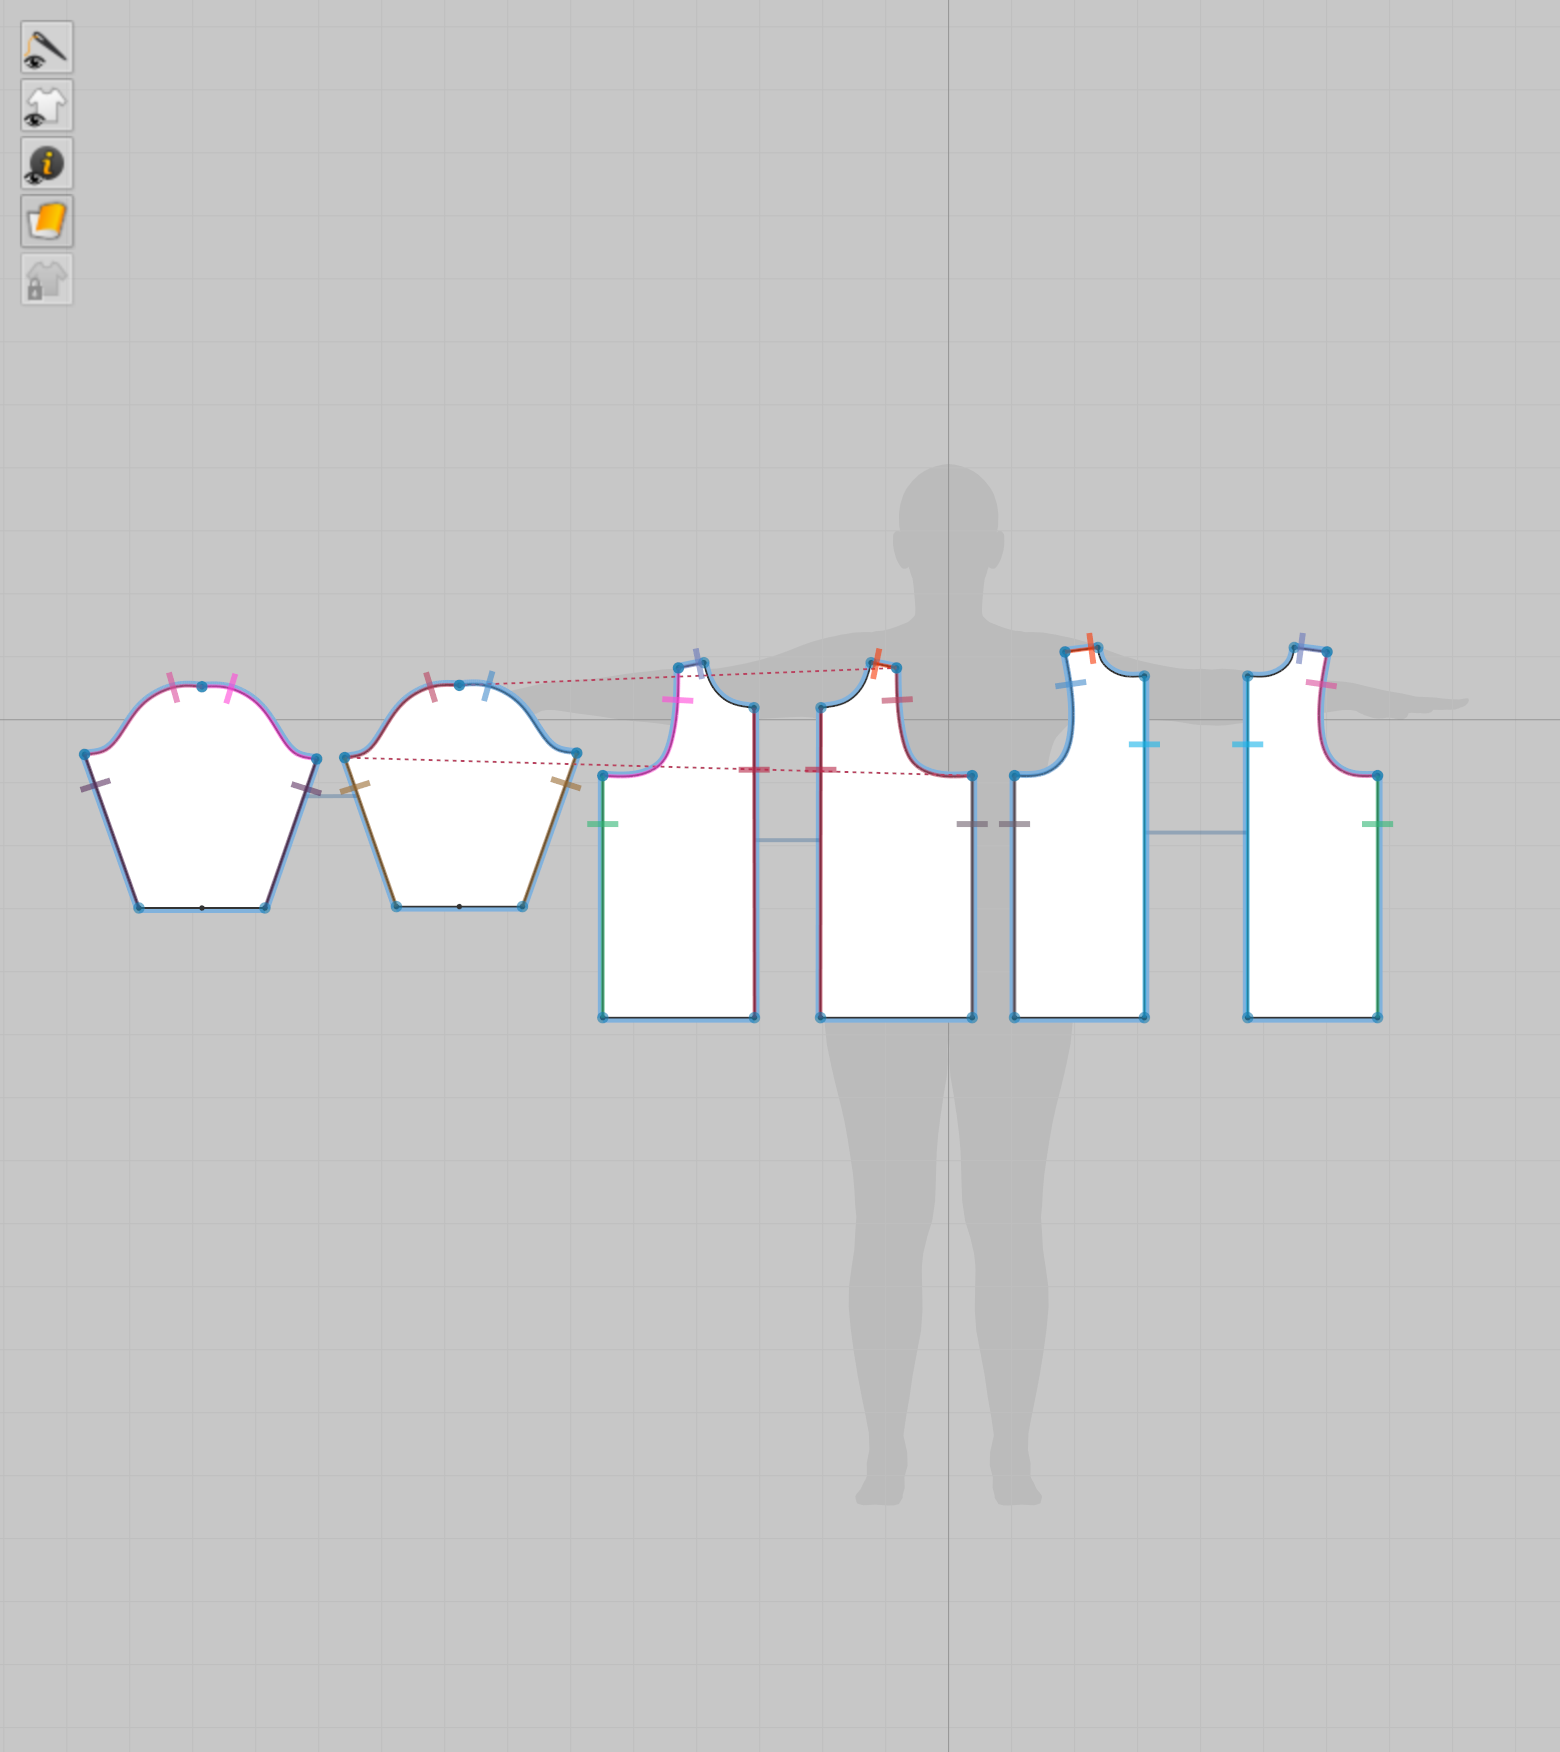
Example sewing patterns
Position Cloth Pieces#
In the 3D view, move the cloth pieces to appropriate positions so they are roughly aligned with the avatar. This initial positioning helps ensure proper draping during simulation:
Positioning cloth pieces
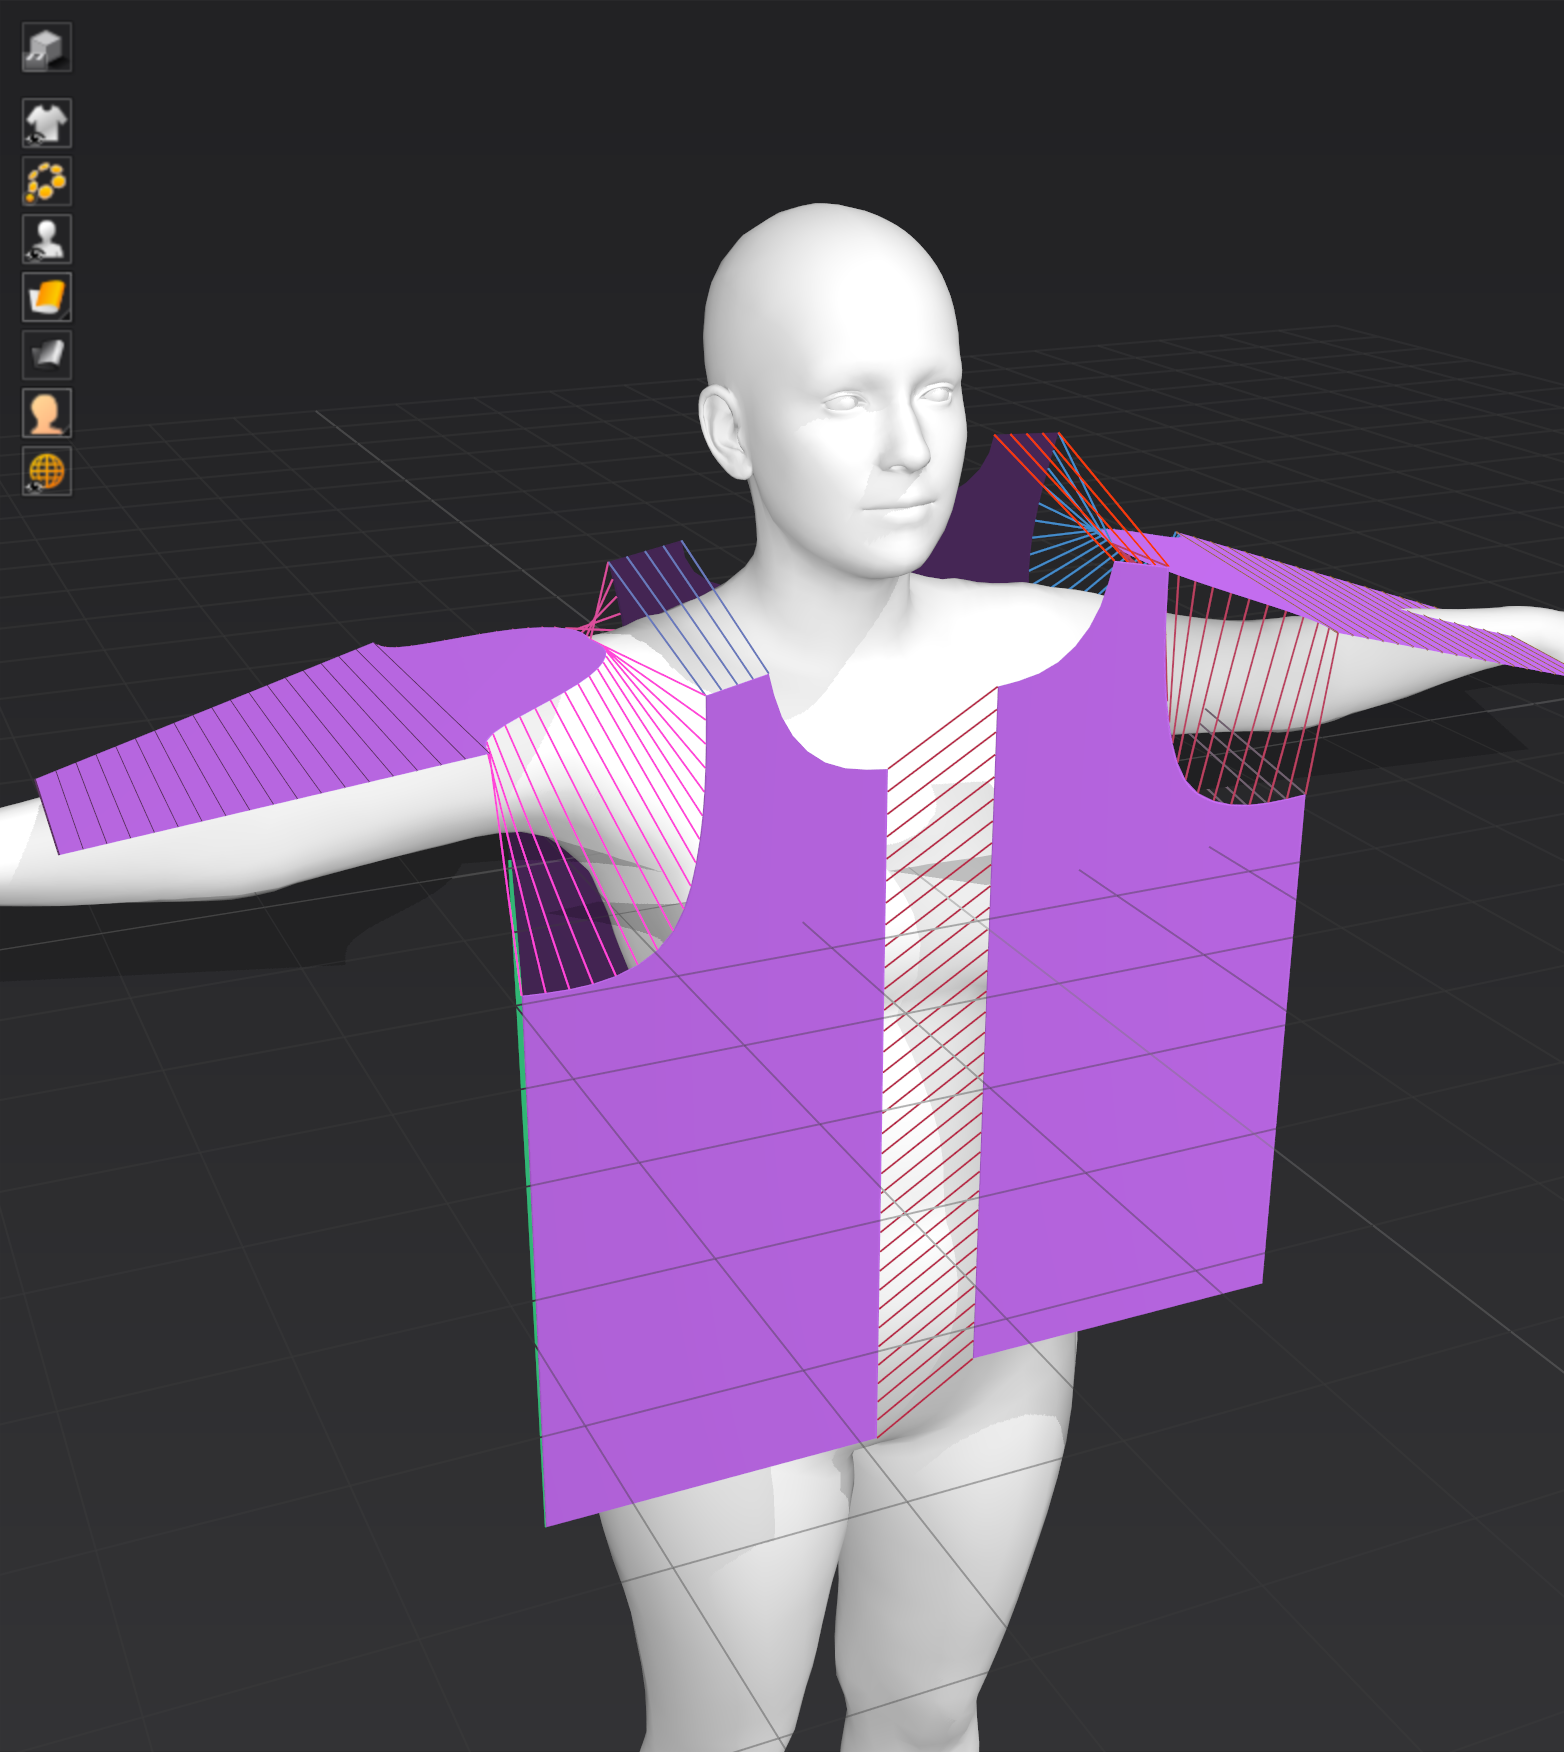
Stitch Sewing Lines#
Connect the cloth pieces by stitching the sewing lines. This creates the garment structure and enables realistic draping simulation:
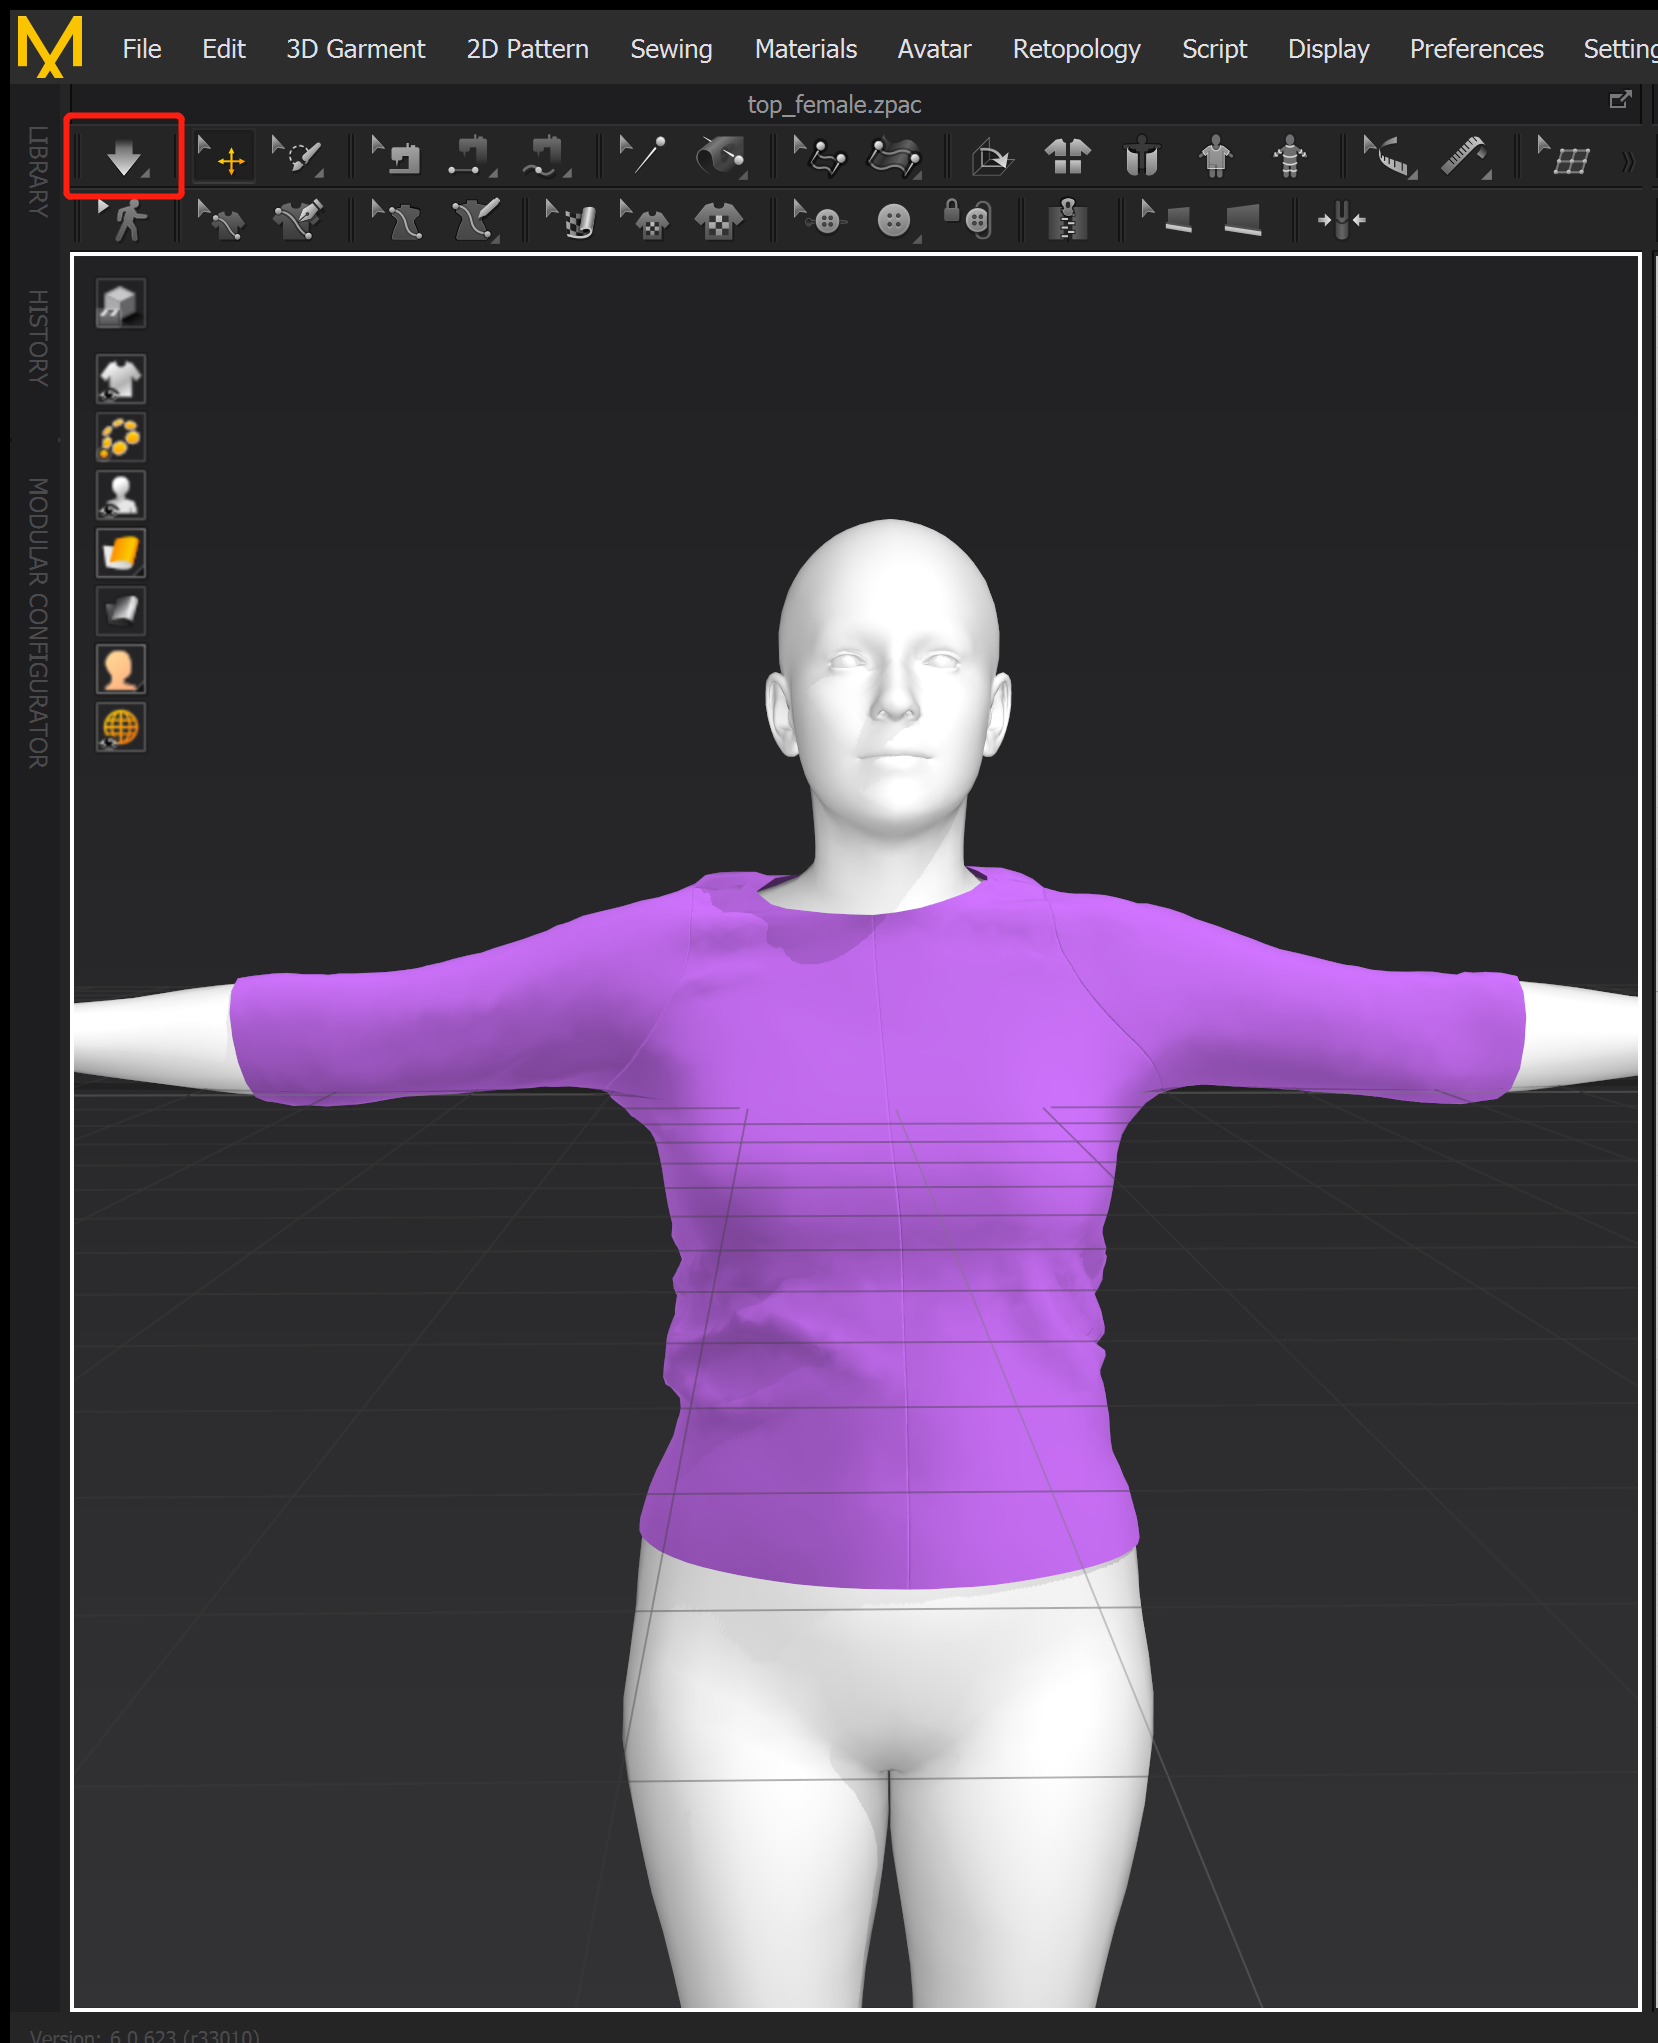
Stitched garment with draping simulation
Export#
Once the garment is properly dressed onto the avatar, export it as an OBJ file for further processing:
Select all sewing patterns in the 2D view
Export the garment using
File → Export → OBJ(Selected):
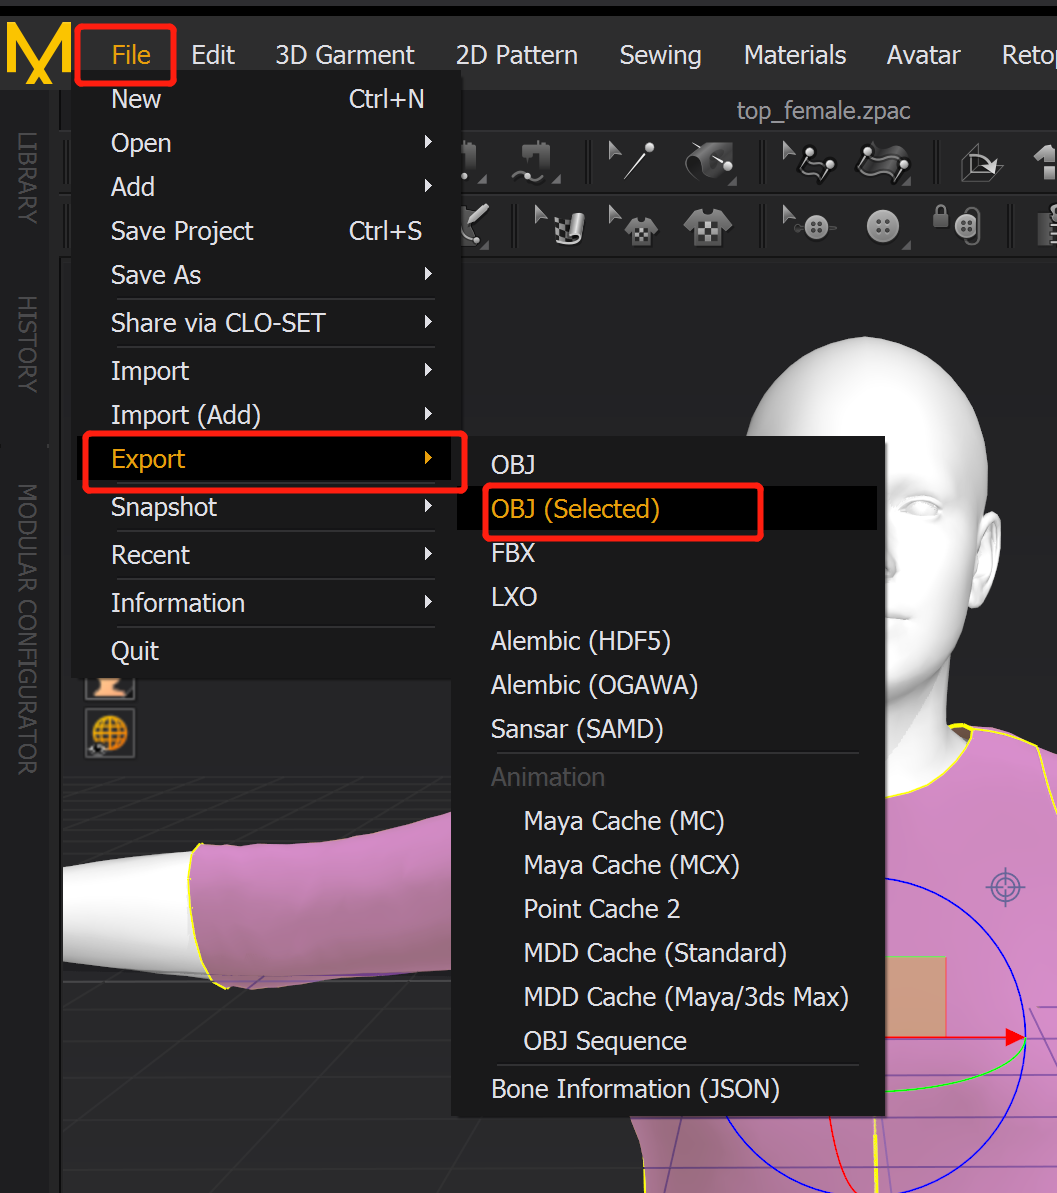
Export menu
In the Export OBJ dialog, enable Select All Patterns, Weld, and Thin, set the Scale to meters (m), configure Axis Conversion to (X, Y(Up), Z):
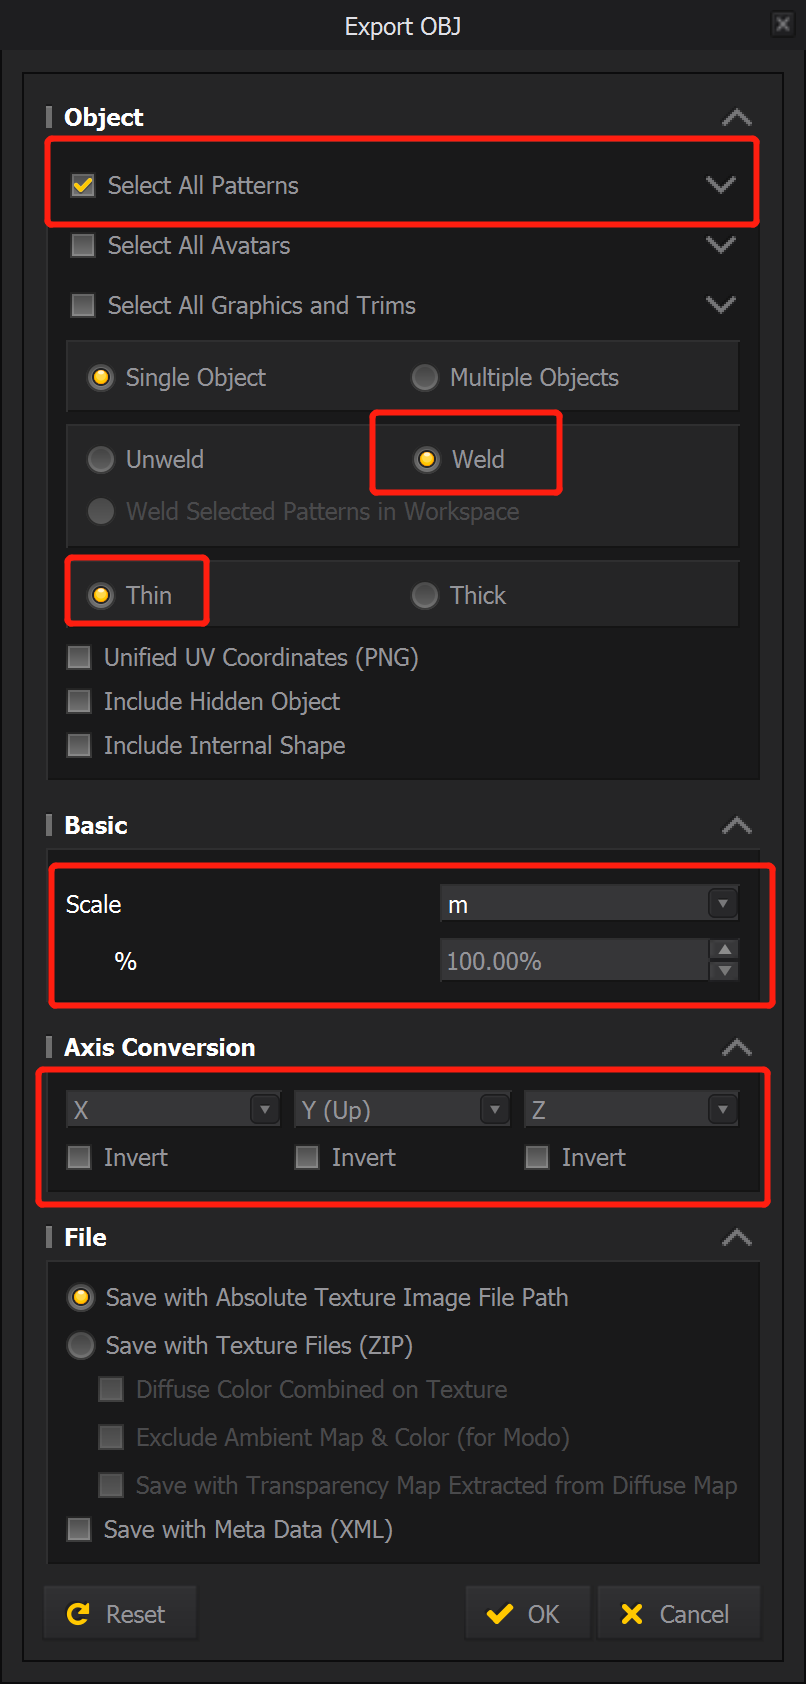
Export OBJ settings
Click OK to export the garment as an .obj file.
UV Layout Adjustment#
After successfully creating a garment mesh in Marvelous Designer, the next step is to optimize the UV layout. Garments exported by Marvelous Designer often have intersecting UV islands and non-uniform scaling. We use Unfold3D to fix these issues.
Import Garment#
Load OBJ file using Files → Load OBJ UV...:

Loading OBJ file in Unfold3D
The imported garment and its UV panel should appear as shown below:
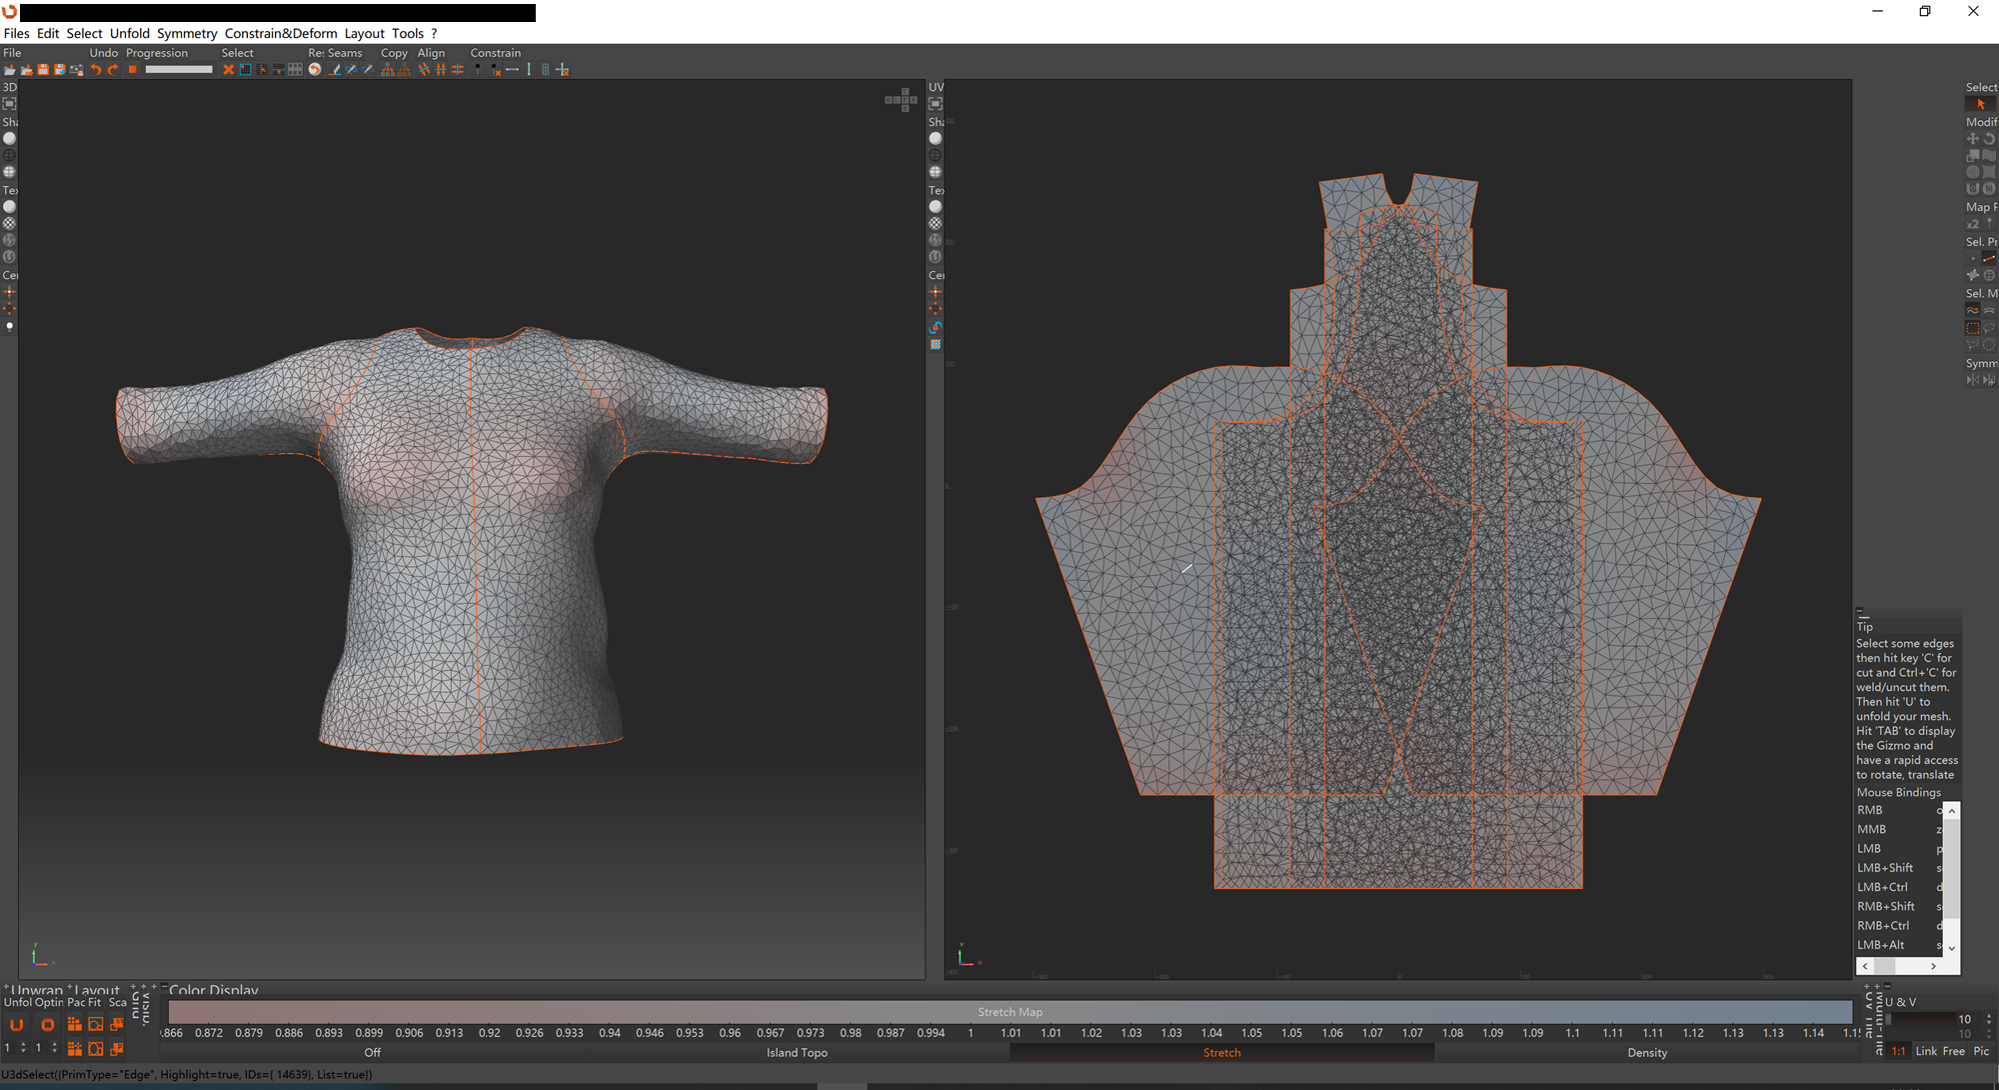
Imported garment with initial UV layout
Normalize UV Coordinates#
Click the Pack Translate button to normalize the UV range to [0, 1] while preserving the orientation:
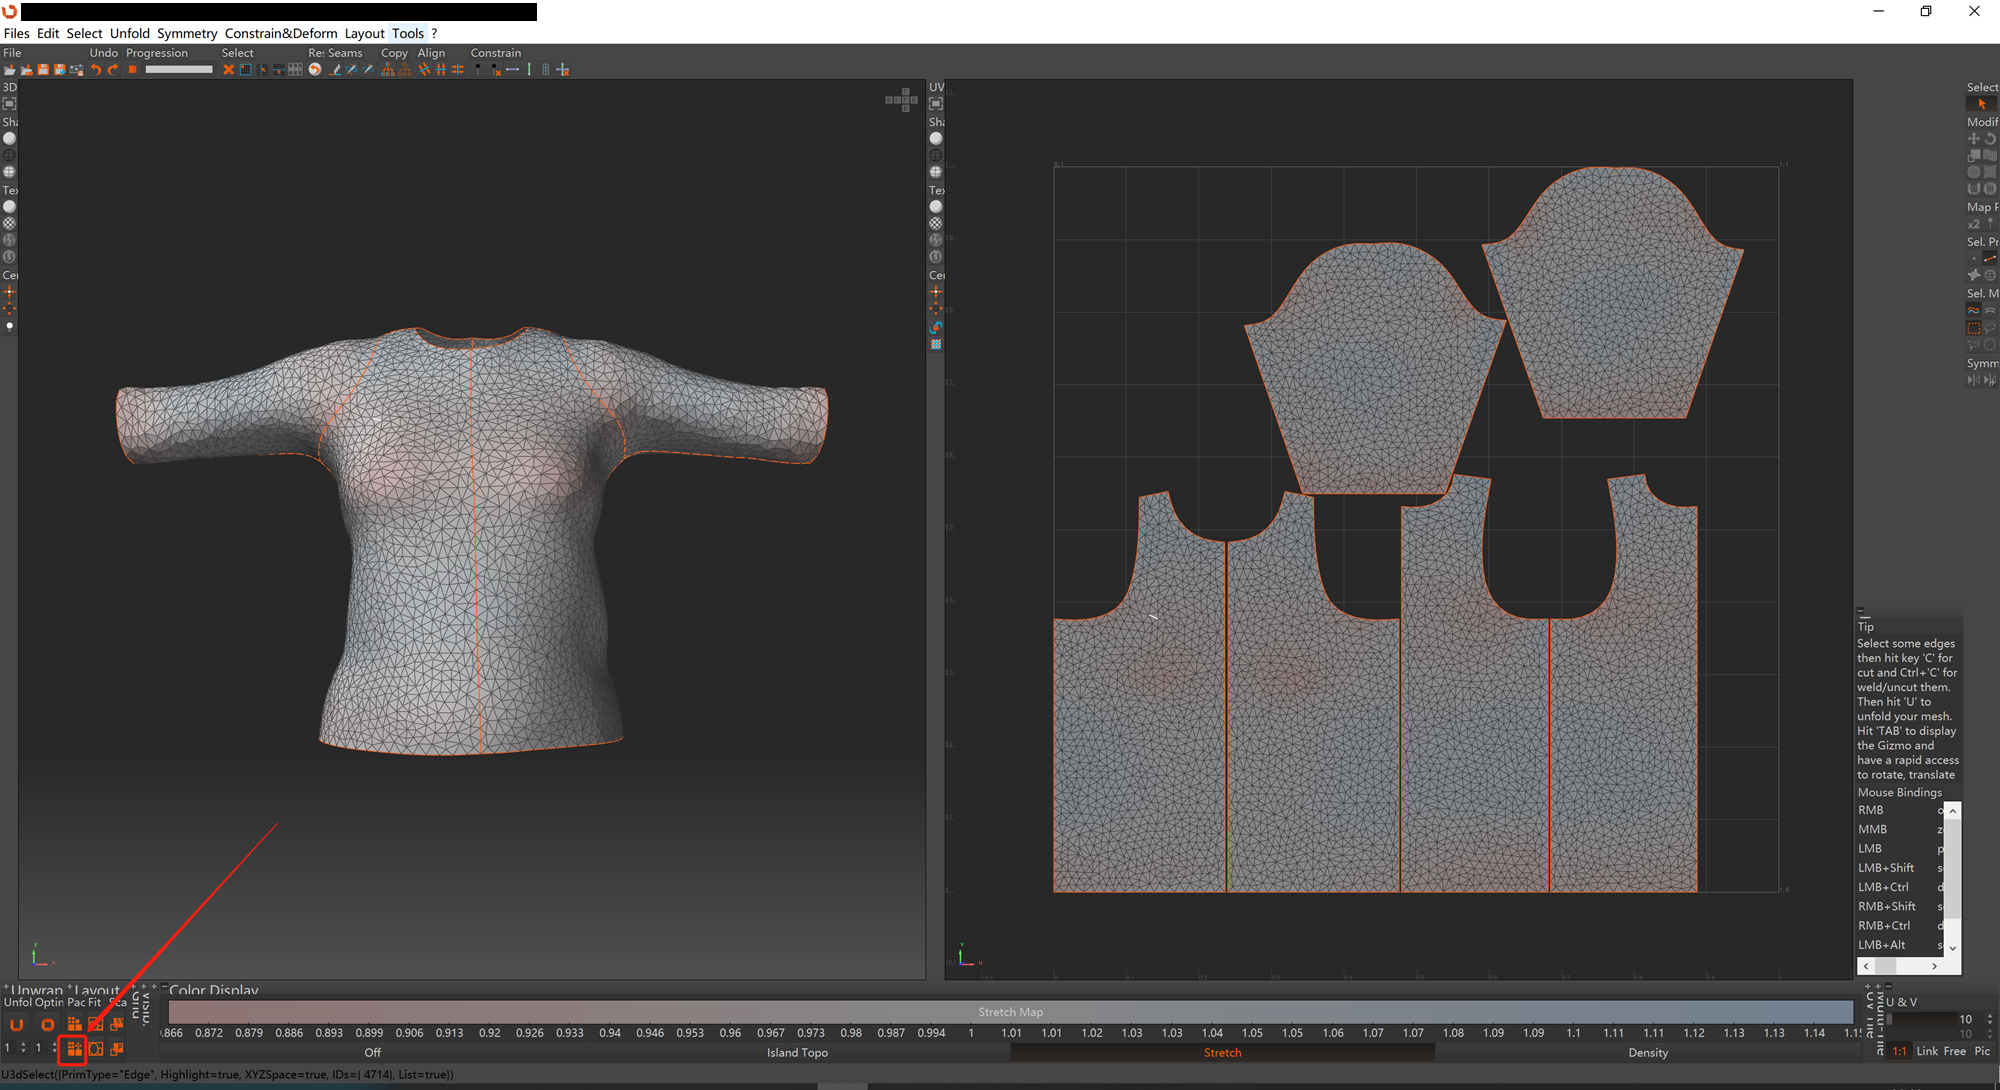
UV layout after Pack Translate operation
Manual UV Layout Adjustment#
Manually adjust UV island positions in the UV layout panel to optimize texture space usage and prevent overlapping:
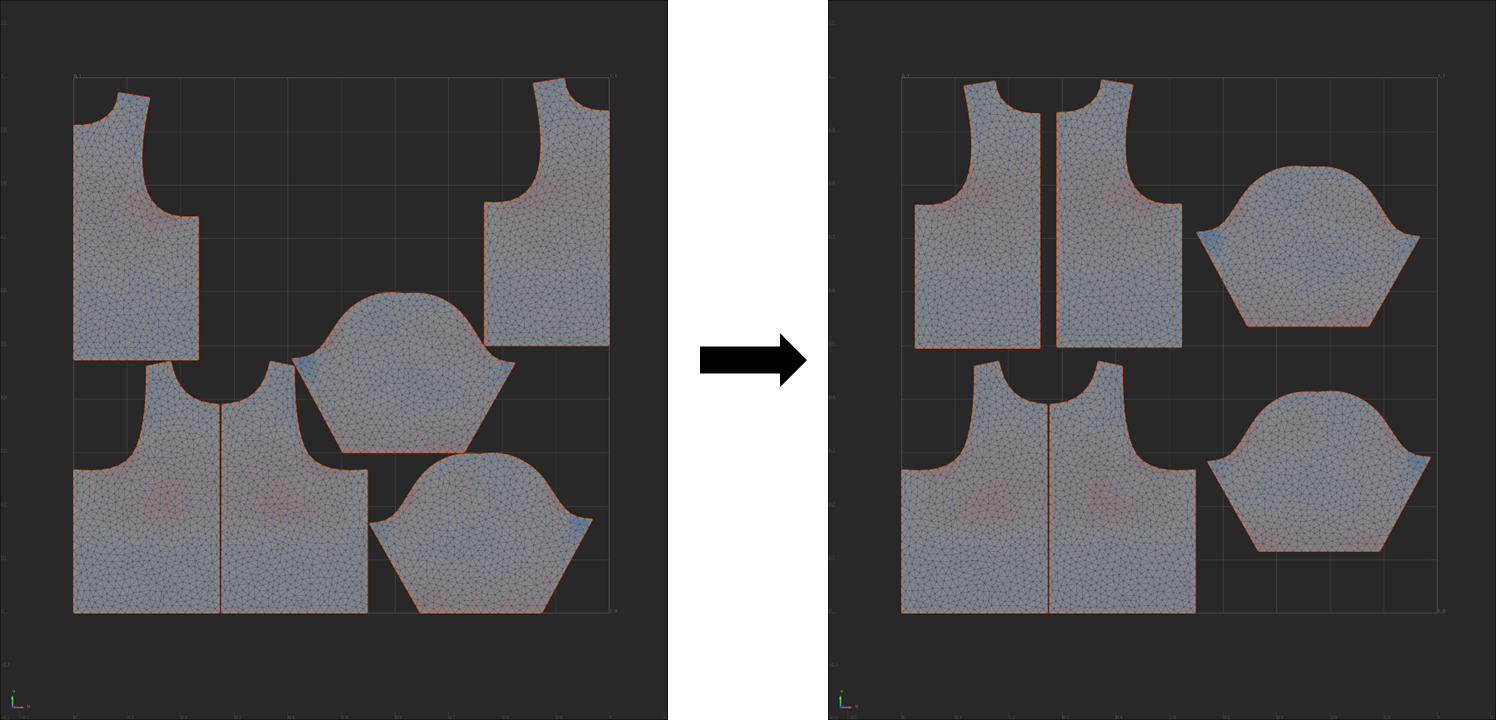
Manually adjusted UV layout
Export Garment#
Export the garment mesh as an .obj file using Files → Save OBJ As...:
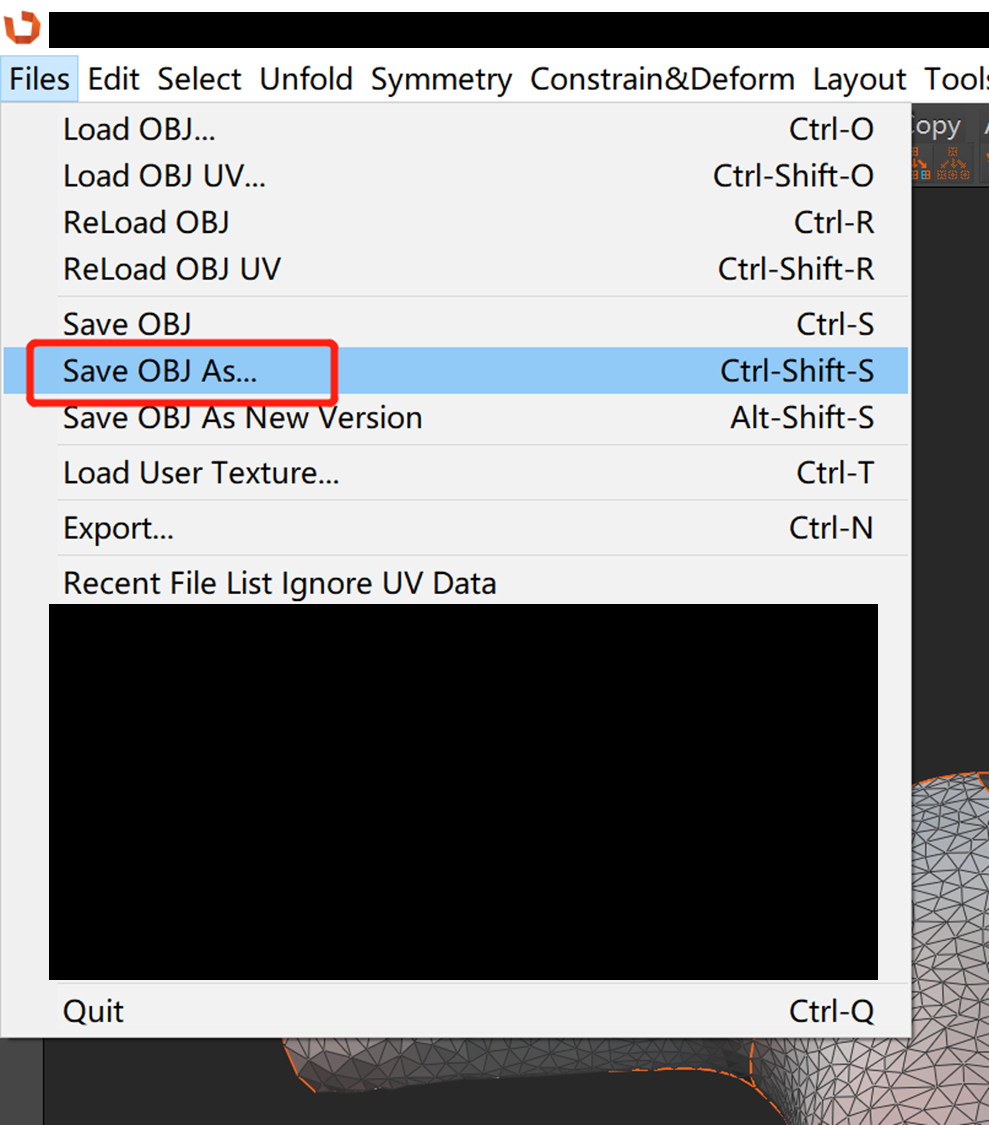
Export menu
Setup Annotations#
XRTailor requires specific metadata to make garment assets functional in the simulation pipeline. The metadata requires the following key components:
STYLE: Defines the garment type under a certain naming convention
BINDING: Specifies constraint points for simulation stability
ATTACHED_INDICES: Sets reference point for long-range attachment (LRA)
Style#
The STYLE field must follow the {PART}_{TYPE}_{GENDER} naming convention:
| COMPONENT | DESCRIPTION | EXAMPLES |
|---|---|---|
| PART | Body region covered by the garment | upper, lower, full |
| TYPE | Specific garment name | hoody, shirt, mid-skirt, long-straight |
| GENDER | Target gender | male, female, neutral |
Here are some style examples:
| PART | DESCRIPTION | EXAMPLE TYPE | EXAMPLE STYLE |
|---|---|---|---|
upper |
Upper body garment | hoody, shirt | upper_hoody_female, upper_shirt_neutral |
lower |
Lower body garment | mid-skirt, long-straight | lower_mid-skirt_female, lower_long-straight_male |
full |
Full-body outfit | shift, drop-waist | full_shift_female, full_drop-waist_neutral |
Binding#
The BINDING constraint is used to limit cloth vertex positions so that they are guaranteed to be close to the avatar during the simulation, which addresses several challenges:
Tethering Effects: Simulate tethering effects like belts or elastic waistband
Collision Recovery: Prevent cloth vertices from slipping off the body when collision response algorithm fails:
High-Speed Movement: Body parts like arms may move at high speed, which may lead to penetration in swift mode
Body Shape Variations: Mannequins with distinctive body shapes may suffer from severe interpenetration
Binding Modes#
We provide four binding modes to facilitate annotation. Sparse marker points can be extended to larger dense areas based on the selected mode:
| MODE | DESCRIPTION | USE CASE |
|---|---|---|
| UV_ISLAND | Extends to all vertices in the same UV island | Large garment sections (sleeves, panels) |
| NEIGHBOR | Extends to 1-ring neighbor vertices | Local constraint areas |
| BOUNDARY | Extends to mesh boundary vertices | Border regions (cuffs, waistline) |
| NONMANIFOLD_EDGES | Extends to vertices with non-manifold edges | Complex seam regions |
Visual Examples#
The following diagram illustrates each binding mode:
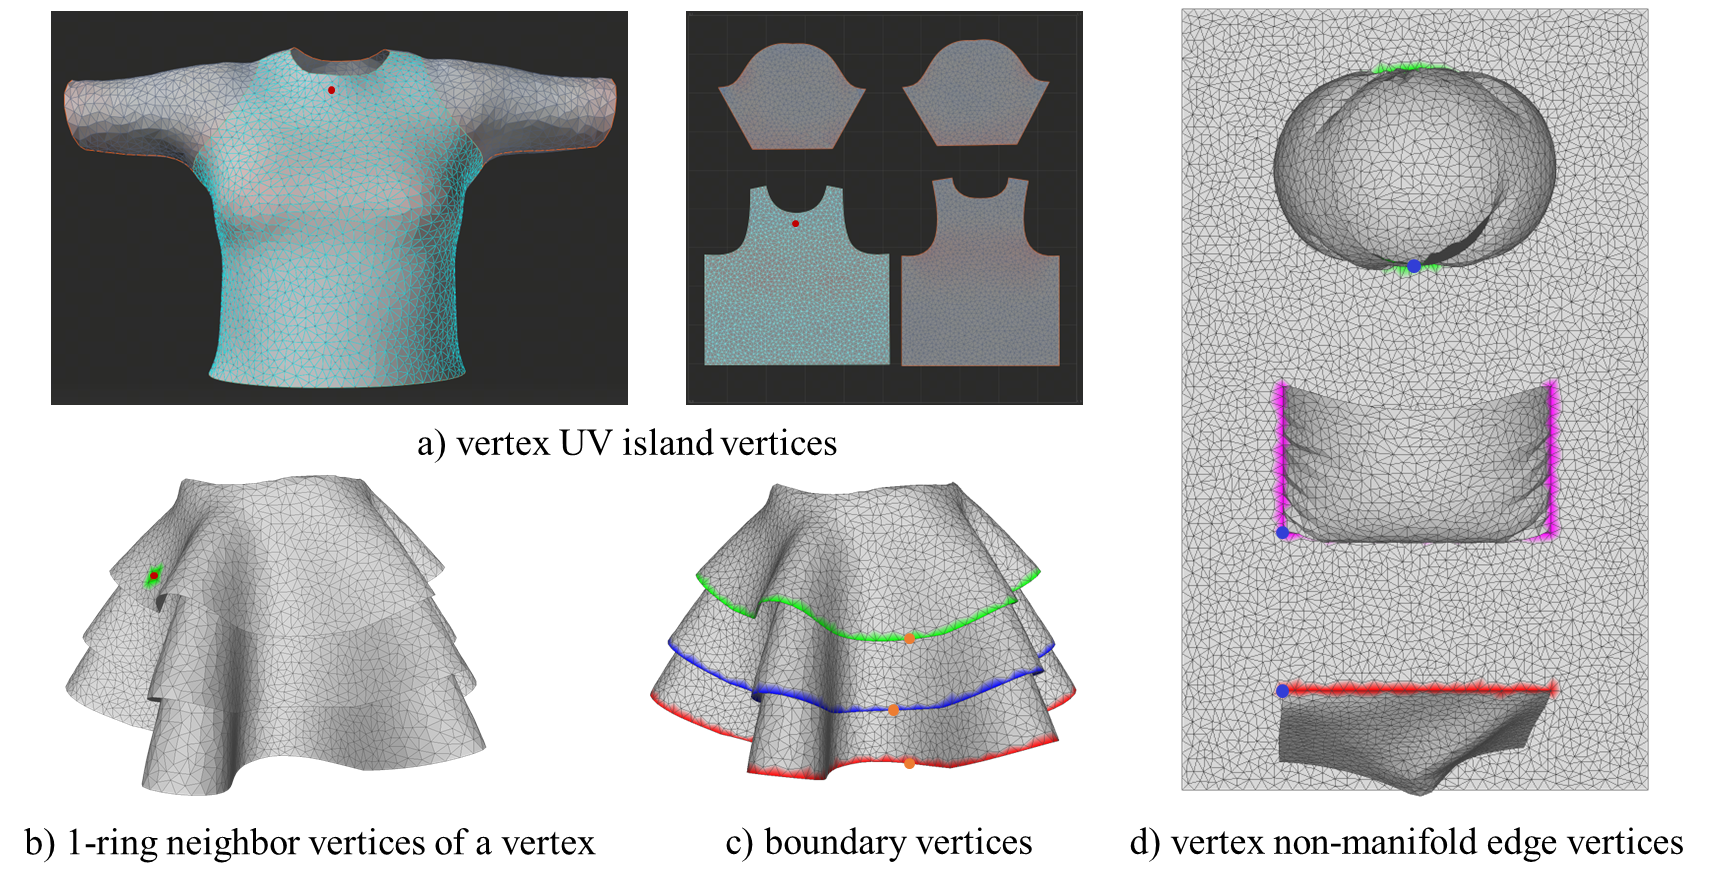
Binding mode examples: (a) UV_ISLAND, (b) NEIGHBOR, (c) BOUNDARY, (d) NONMANIFOLD_EDGES
Detailed Explanations:
UV_ISLAND (a): The red marker point extends to all vertices in the same UV island (shown in green)
NEIGHBOR (b): The red marker point extends to its 1-ring neighbor vertices (shown in green)
BOUNDARY (c): Three orange marker points extend to boundary vertices (shown in green, blue, and red)
NONMANIFOLD_EDGES (d): Three blue marker points extend to vertices with non-manifold edges (an edge that is connected to more than two faces), shown in green, purple, and red
Attached Indices#
The ATTACHED_INDICES field specifies reference points for Long-Range Attachment constraints. The algorithm will apply global strain limit between the reference point and all cloth vertices. The marker point should be selected as a cloth vertex that is close to the body during simulation. In practice, we choose one of the marker points defined in the BINDING section as the reference point.
Interactive Annotation#
We use MeshLab to select marker points interactively. Follow these steps:
Import and Select Marker Points#
Import the garment mesh using
File → Import Mesh...Enter pick mode by pressing the
Get InfobuttonClick on the garment mesh to select marker points
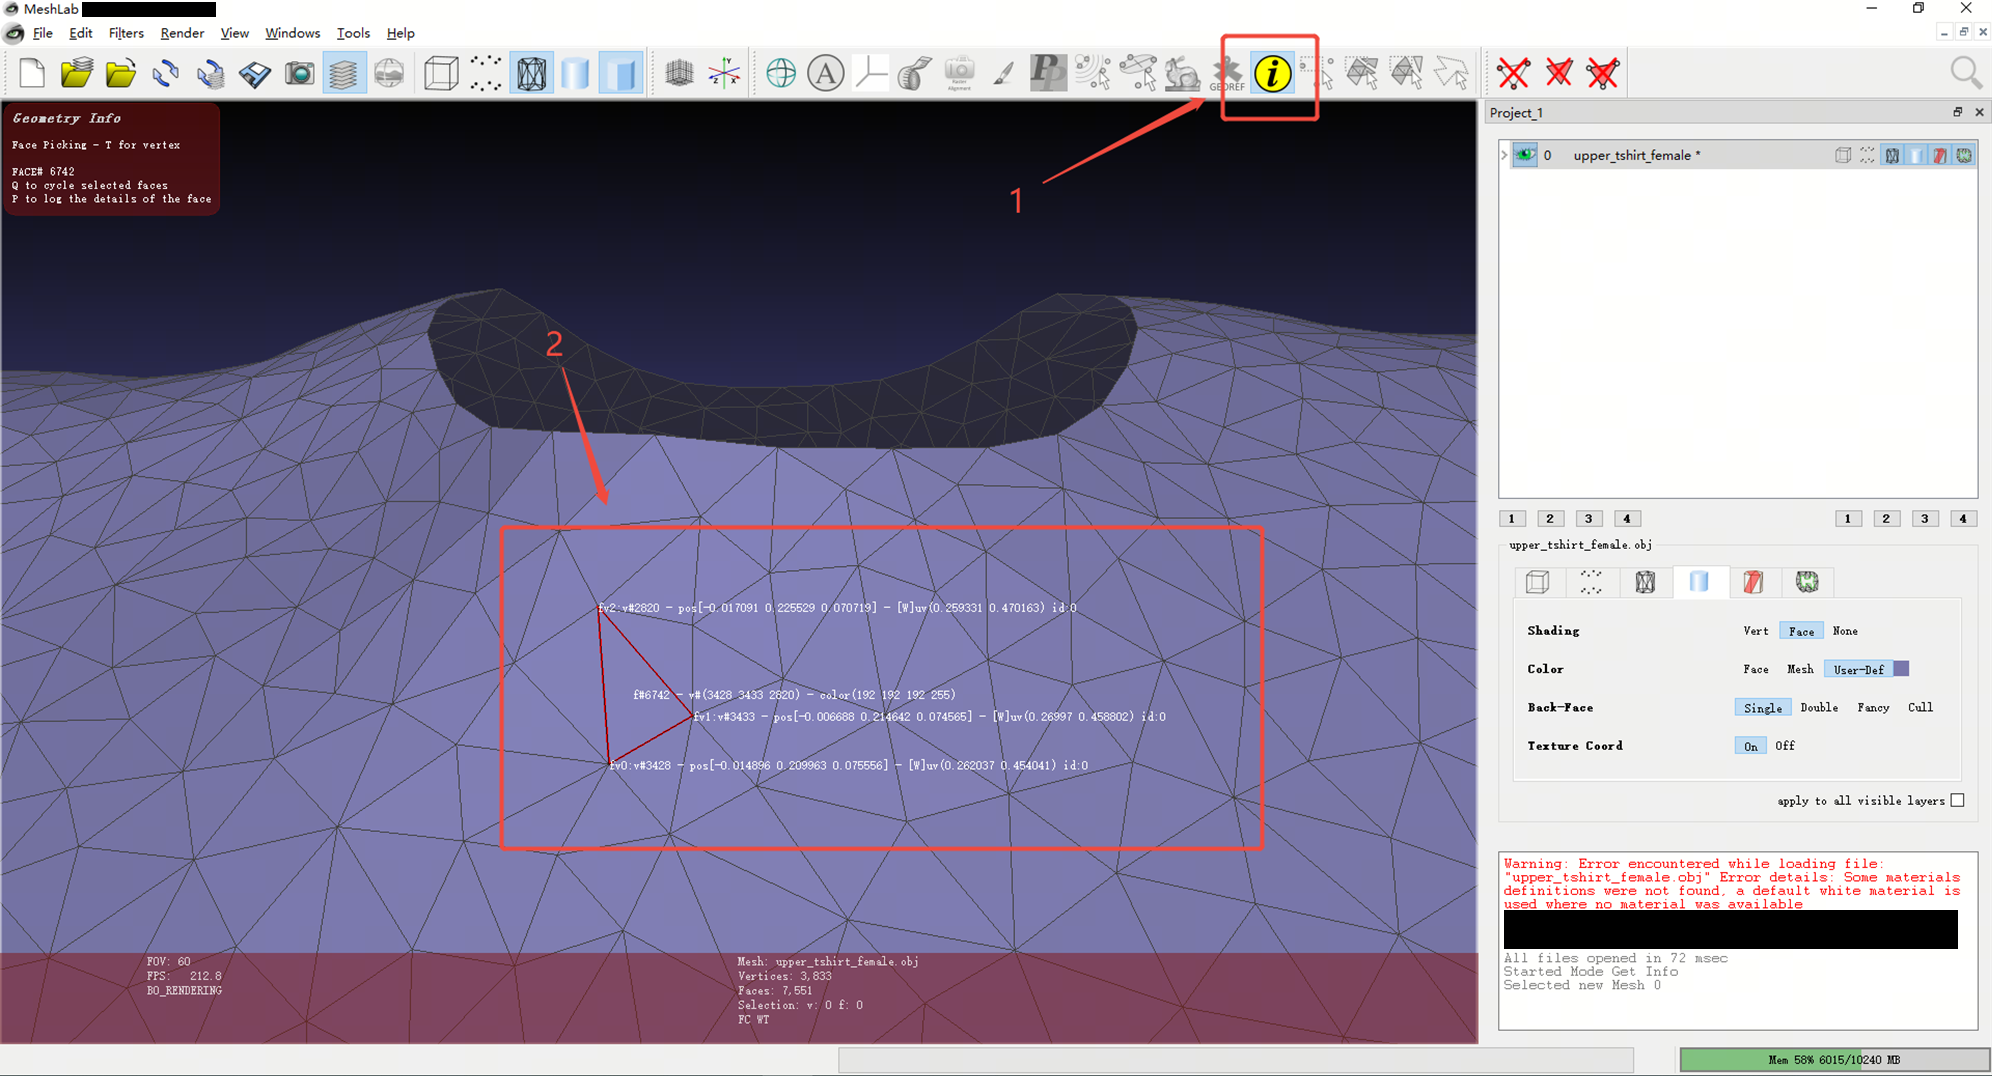
Selecting marker points
Record Vertex Indices#
Important: Record the vertex indices of all selected marker points. You will need these indices when creating the configuration file.
Export the Mesh#
Export the mesh as an .obj file with the following settings:
Vert: Check
NormalWedge: Check
TexCoord
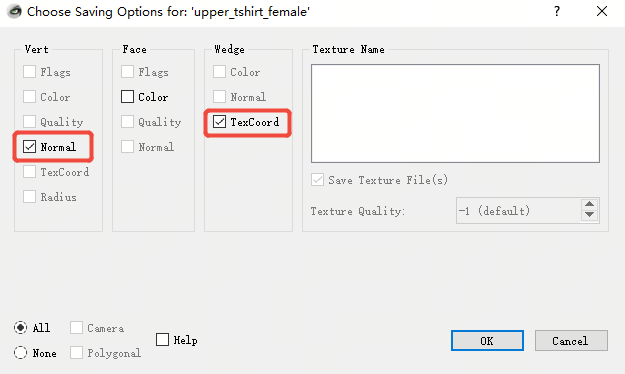
Mesh export settings
The exported mesh file should be named as {PART}_{TYPE}_{GENDER}.obj and placed in the appropriate assets folder:
Assets/Garment/${BODY_MODEL}/Template/{PART}_{TYPE}_{GENDER}.obj
Example: For a garment with style upper_tshirt_female and body model SMPL(H):
Assets/Garment/SMPLH/Template/upper_tshirt_female.obj
Configuration File Creation#
Create a corresponding JSON configuration file:
Assets/Garment/${BODY_MODEL}/Config/{PART}_{TYPE}_{GENDER}.json
Example: For the same garment:
Assets/Garment/SMPLH/Config/upper_tshirt_female.json
Configuration File Structure#
The configuration file contains all the metadata required for simulation. Here’s a complete example:
{
    "STYLE": "upper_tshirt_female",
    "MASS": 1.0,
    "ATTACHED_INDICES": [2443],
    "BINDING": {
        "UV_ISLAND": {
            "INDICES": [1575, 600],
            "STIFFNESS": [1.0, 1.0],
            "DISTANCE": [0.05, 0.05]
        },
        "NEIGHBOR": {
            "INDICES": [
                1177, 1178, 1179, 1180, 1181, 1182,
                1143, 1142, 1141, 1140, 1139, 1138
            ],
            "STIFFNESS": [
                1.0, 1.0, 1.0, 1.0, 1.0, 1.0,
                1.0, 1.0, 1.0, 1.0, 1.0, 1.0
            ],
            "DISTANCE": [
                0.1, 0.1, 0.1, 0.1, 0.1, 0.1,
                0.1, 0.1, 0.1, 0.1, 0.1, 0.1
            ]
        },
        "BOUNDARY": {
            "INDICES": [],
            "STIFFNESS": [],
            "DISTANCE": []
        },
        "NONMANIFOLD_EDGES": {
            "INDICES": [],
            "STIFFNESS": [],
            "DISTANCE": []
        }
    }
}
Detailed Parameters#
| PARAMETER | TYPE | DESCRIPTION | RANGE |
|---|---|---|---|
STYLE |
String | Garment style following naming convention | {PART}_{TYPE}_{GENDER} |
MASS |
Float | Vertex mass for simulation | > 0 |
ATTACHED_INDICES |
Array | LRA reference point indices | Vertex indices |
INDICES |
Array | Marker point vertex indices | Vertex indices |
STIFFNESS |
Array | Constraint strength | [0.0, 1.0] |
DISTANCE |
Array | Maximum movement distance | > 0 |
Example Configuration Breakdown#
UV_ISLAND: Marks sleeve vertices (fast-moving areas) with high stiffness
NEIGHBOR: Marks underarm vertices (distinctive body shape areas) with medium stiffness
BOUNDARY/NONMANIFOLD_EDGES: Empty arrays (not used in this example)
Final Verification#
Before testing, double-check that both files are properly placed:
Mesh file:
Assets/Garment/${BODY_MODEL}/Template/{PART}_{TYPE}_{GENDER}.objConfiguration file:
Assets/Garment/${BODY_MODEL}/Config/{PART}_{TYPE}_{GENDER}.json
Test The Pipeline#
Once your garment asset is properly configured, you can test it in the simulation pipeline.
Update Simulation Configuration#
To use the newly created garment asset, update the CLOTH_STYLES field in your simulation configuration:
{
    "PIPELINE_SMPL": {
        "CLOTH_STYLES": ["{PART}_{TYPE}_{GENDER}"]
    }
}
Example: For a female t-shirt:
{
    "PIPELINE_SMPL": {
        "CLOTH_STYLES": ["upper_tshirt_female"]
    }
}
Run the Simulation#
Execute the simulation with your configuration files:
./XRTailor --simulation_config="./simulation_conf.json" --engine_config="./engine_conf.json"